Posted At: Apr 12, 2024 - 761 Views

Flutter is storming the world and for a good reason. It is so versatile, fast, and efficient in terms of app development that allows developers (even those completely new to programming) to create beautiful high-performance applications on Android, iOS, web, and even desktop platforms, all from the same code base. Whether you're someone who has dabbled in code before or a complete newbie, this will be your laid-back yet thorough companion guide to helping you build your first Flutter app. So grab your favourite drink, get comfortable, and let's get going!
Why Should You Choose Flutter?
Google created Flutter, a modern application-development framework that makes it highly easy and effective to build beautiful applications. Below are some possible reasons Flutter is an ideal candidate for beginners to professional developers:
Cross-Platform Development: Develop for Android, iOS, web, and desktop from a single source code.
Fast Development: Edit modifications in real-time while the app is still in action.
Rich UI Components: An extensive collection of Flutter supplemented the custom widgets used for elegant user interface design.
Powered by Dart: Educational and simple, yet powerful programming language, which is beginner-friendly and easy to learn.
In the Growing Ecosystem: A vibrant life has been given to the Flutter community. A plethora of packages and plugins were found at a pub.dev to add fun to your baby.
This ends the journey with a fully functional "Hello, World!" Flutter app and the confidence to go through the cross-platform developmentworld.
Step 1: Setting Up Your Flutter Development Environment
Before you start coding, you need to set up your development environment. Here’s what you need to do:
1. Install Flutter SDK
Visit the official Flutter installation page.
Obtain and install the Flutter SDK according to your operating system (Windows, macOS, or Linux).
Add Flutter to your system's PATH such that it can be accessed from your terminal.
2. Choose an IDE (Integrated Development Environment)
Any of the following highly regarded IDEs can be used with Flutter:
Visual Studio Code (VS Code)- this is light, speedy, and beginner-friendly.
Android Studio: This is the complete IDE for Android and Flutter development.
IntelliJ IDEA: A full-featured IDE with robust support for Flutter and Dart.
Pro Tip: Do not forget to install the plugins for Flutter and Dart in the chosen IDE.
3. Configure your device or emulator.
You need a device to test the application:
Emulator/Simulator: Set up Android emulators or iOS simulators in your IDE.
Physical Device: Connect the Android device or iOS device via USB and enable USB debugging.
Step 2: Creating Your First Flutter Project
You are now ready to kick-start your development environment and create your very first Flutter app:
1. Open the IDE and choose "Create New Flutter Project."
2. Enter a pretty cool name for your project; then choose the directory to save it.
3. Finally, select the default Flutter template to get things started.
4. Just let the IDE work its magic-your project will be ready in seconds!
Step 3: Understanding the Flutter Project Structure
When you open your project, here's what you'll get:
lib/: In the most important folder, lib/, you'll store all your Dart code.
The main file is main. dart.
Android/: Contains Android-specific configuration files.
Ios/: Houses iOS-specific files.
Test/: Test/ is a key component of app quality and performance testing.
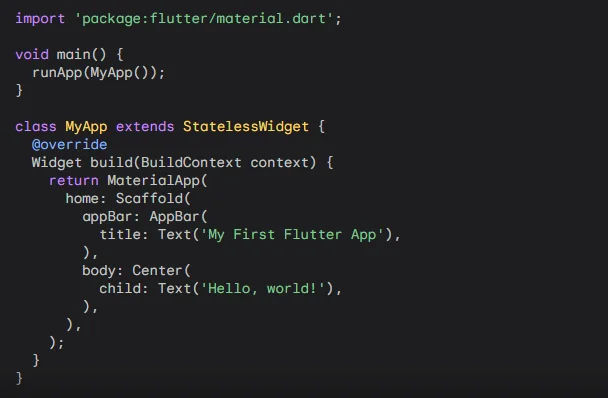
Step 4: Writing Your First Flutter Code
Create a simple "Hello, World!" message by editing the code in the lib/main. dart file and changing the format to display it. Note:

Step 5: Run and Test Your Flutter App
Time to see your app in action:
Select your target device (emulator or physical device).
Hit the Run button in your IDE or use the command:
flutter run
Your app will launch, and you’ll see the "Hello, World!" message on the screen.
Pro Tip: If you make changes to the code, use hot reload by saving the file. It will update instantly!
Step 6: Customize Your Flutter App
Here are some suggestions to customize a basic app that you have created:
Add Widgets: Test out buttons, text fields as well as images and lists.
Personalize Design: Change colors, fonts, and themes.
Explore Packages: Integrate advanced features like animations, HTTP requests, and more with pub.dev.get there.
Step 7: Keep Learning and Building
You have just created your very first Flutter application. This is only a starting point. Consider these materials to further polish your skills:
Responsive Layouts in Flutter: Make apps look awesome on any device.
Flutter Performance Optimization: Speed things up for a better user experience.
Comprehensive Flutter Testing: Ensure that your application runs smoothly.
Cross-Platform Development: Build apps for Android, iOS, and the web.
Conclusion
Well done! You’ve taken your first steps into the exciting world of Flutter development. Whether you dream of building stunning mobile apps or powerful web applications, Flutter has everything you need to succeed. So keep coding, keep experimenting, and most importantly—have fun building amazing apps!


